Build a Double-Decker RoverBot
This AppNote decribes construction of the RoverBot. The RoverBot base requires only rudimentary construction skills (straight cuts only) and can be made using a number of materials, including 1/4"-thick aircraft-grade plywood, 1/4"-thick expanded PVC sheet, or 1/8" acrylic plastic. It’s designed to be easy to build and easy to expand.
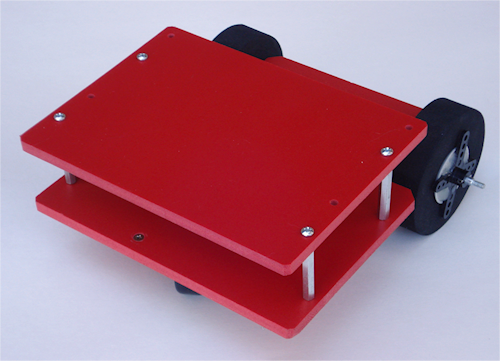
RoverBot uses two pieces, or decks, for its base. The bottom deck measures 6" × 6-1/2" and has cutout wells for the tires. You’d put the batteries there. The top deck measures 6" × 4-1/2" and is the perfect spot for a microcontroller, solderless breadboard for prototyping, and various sensors.
The drive motors for the RoverBot are Tamiya Worm Gear Box, #72004, available at Tower Hobbies and many other online resources—see Appendix C, “Internet Parts Sources.” It’s the same motor that was used for the PlyBot described in Chapter 8, “Build a Motorized Wooden Platform.” You need two motors
The worm gearbox motor is provided as a kit; it’s assembled into a compact, self-contained housing and comes with a shaft that can be attached to numerous styles of wheels. More about this later.
Cutting and Drilling
Refer to Figure 1 for Roverbot’s cutting and drilling template. Begin by cutting the pieces to size. Use a hacksaw, coping saw, jigsaw, bandsaw, or scroll saw—whatever you happen to have in the shop. I prefer to use a scroll saw, as it provides more control. Cut out the basic rectangular shapes first, then go back to cut out the wheel wells.
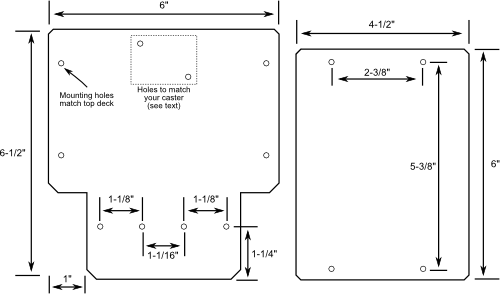
[Figure 1]
With cutting complete, drill the holes as shown in the template using a 1/8" bit. The exact location of the holes is not critical, except for the 1-1/8" spacing for each of the motors. Try to get these as accurate as possible. You can use the frame of the motor to mark off the spacing for the holes.
Mounting the Motors and Wheels
Assemble the two worm gear motors following the instructions that come with the kits. The motors are assembled using a screwdriver, small needle-nose pliers (neither is included in the kit), and a small hex key wrench (which is included).
The worm gear motor kit comes with two styles of metal axles, with and without a hole on each end for a spring (roll) pin. You want the axle with the holes. You can save the other axle for another project.
You have several options for the wheels. I’ve shown the RoverBot using a pair of 2-3/4"-diameter Dave Brown Lite Flite foam tires, which are available at most any hobby store. Each wheel is secured to the shaft of the worm gear motor using a plastic X-hub, which is included with the motor kit. You also need two 3/16” shaft collars, which are available at hobby stores. Use small, #4 self-tapping screws or hot-melt glue to attach the plastic hub to the side of the wheel. Be sure the hub is centered over the wheel; you can slide the wheel and hub over the axle to ensure proper centering.
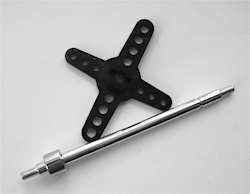
Refer to Figure 2 to attach the wheel:
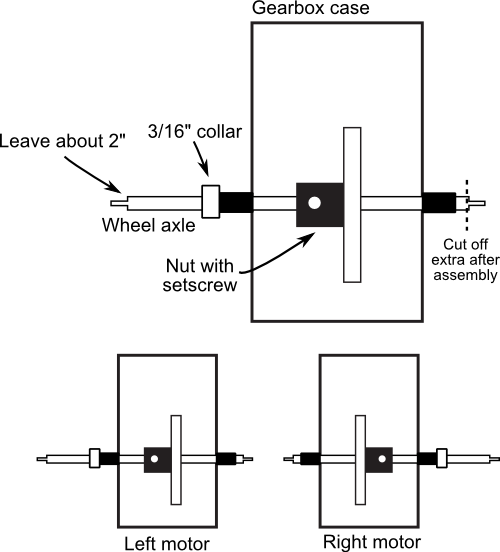
[Figure 2]
- Place the worm gear motor so that the mounting flange rests on the table, and the motor is facing away from you.
- Using the hex key wrench included with the gear motor kit, loosen the setscrew over the drive gear. (If the setscrew is not accessible in this position, remove the motor and manually turn the gears so that the setscrew points straight up. Snap the motor back in place when done.)
- Pull out the axle so that approximately 2-1/2" of its length extend to the right of the motor housing.
- Slip the shaft collar over the right side of the axle.
- Place the wheel, with the plastic hub facing to the right, over the axle and next to the collar.
- Carefully insert the spring pin into the hole at the right side of the axle.
- Position the notch of the hub over the spring pin.
- Slide the shaft collar against the opposite side of the wheel for a snug fit.
- Push in the axle so that the shaft collar touches the motor housing, then tighten the shaft collar.
This completes the right motor. Construct the left motor, this time in mirror image.
The axles are a bit too long to allow the motors to sit so closely side by side. Once the motors are constructed and the wheels attached, saw off the opposite end of the axle using a hacksaw.
Finish by attaching the two motors to the bottom deck using 4-40 by 1/2" machine screws and 4-40 nuts. The heads of the screws should be on the motor side. Figure 3 shows the underside of the RoverBot, with the motors secured.
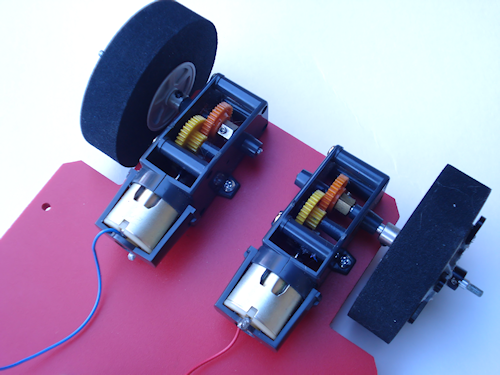
[Figure 3]
Mounting the Swivel Caster
RoverBot is supported by a single swivel caster, mounted on the opposite end as the motors. Use a 1-1/4" ball bearing caster, available at Lowe’s and other home improvement stores.
Use the baseplate of your caster to mark the holes for drilling. Use a 1/8" bit. The caster is attached using 4-40 by 1/2" machine screws and nuts (see Figure 4). If desired, you can increase the height of the caster by stacking up a bunch of #4 washers. Use a longer screw if you need to. With the caster and wheels specified, the front of the RoverBot tips down slightly on the caster end. Use the washers if you feel the need to make it level.
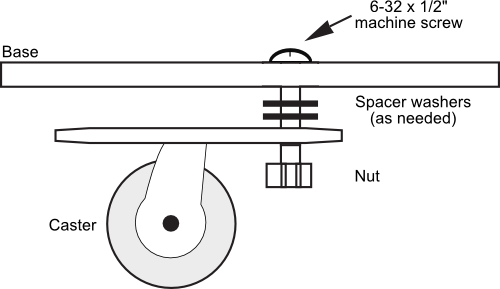
[Figure 4]
Second Deck, Batteries, Brain
Add the top deck using standoffs of your choice. I used 1-1/4"-long F-F (female-female) hex standoffs for 4-40 size machine screws, but you can substitute for just about anything else, as long as the standoffs are at least 1/2" (so you can place a battery holder on the bottom deck).