The Clapper Gripper
The “clapper” gripper is a popular design, favored because of its easy construction and simple mechanics. You can build the clapper using metal, plastic, or wood, or a combination of all three. The details given here work when using most any material, including wood (1/8" or so aircraft-grade plywood recommended), plastic, or even thin metal.
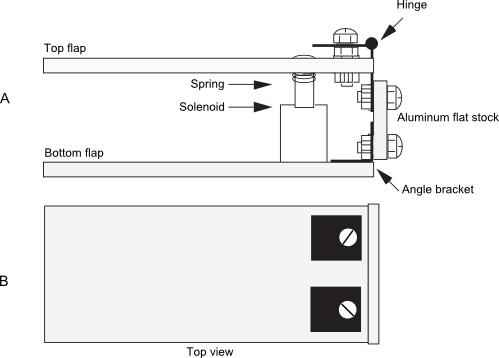
The clapper consists of a wrist joint (which, for the time being, we’ll assume is permanently attached to the forearm of the robot). Connected to the wrist are two plastic plates. The bottom plate is secured to the wrist; the top plate is hinged. A small spring-loaded solenoid is positioned inside, between the two plates. When the solenoid is not activated, the spring pushes the two flaps out, and the gripper is open. When the solenoid is activated, the plunger pulls in, and the gripper closes. The amount of movement at the end of the gripper is minimal—about 1/2" with most solenoids. However, that is enough for general gripping tasks.
Cut two 1/16"-thick acrylic plastic pieces to 1-1/2" × 2-1/3". Attach the lower flap to two 1" × 3/8" corner angle brackets. Place the brackets approximately 1/8" from either side of the flap. Secure the pieces using 6-32 × 1/2" machine screws and 6-32 nuts. Cut a 1-1/2" length of 1-1/2" × 1/8" aluminum bar stock.
Attach the top flap to a 1-1/2" × 1" (approximately) brass or aluminum miniature hinge. Drill out the holes in the hinge with a #28 drill to accept 6-32 screws. Secure the hinge using 6-32 screws and nuts.
The choice of solenoid is important because it must be small enough to fit within the two flaps and it must have a flat bottom to facilitate mounting. It must also operate with the voltage used in your robot, usually 6 or 12 volts. Some solenoids have mounting flanges opposite the plunger. If yours does, use the flange to secure the solenoid to the bottom flap. Otherwise, mount the solenoid in the center of the bottom flap, approximately 1/2" from the back end (nearest the brackets), with a large glob of household cement. Let it stand to dry.
Align the top flap over the solenoid. Make a mark at the point where the plunger contacts the plastic. Drill a hole just large enough for the plunger; you want a tight fit. Insert the plunger through the hole and push down so that the plunger starts to peek through. Align the top and bottom flaps so they are parallel to one another.
Using the mounting holes in the hinges as a guide, mark corresponding holes in the aluminum bar. Drill holes and mount the hinge using 6-32 × 1/2" machine screws and nuts. The finished clapper should look like this.

Test the operation of the clapper by activating the solenoid. If the plunger works loose, apply some household cement to keep it in place. You may want to add a short piece of rubber weather stripping to the inside ends of the clappers so they can grasp objects more easily. You can also use stick-on rubber feet squares, available at most hardware and electronics stores.