Stupid Light Tricks
There are many ways you can trick out your robot with light effects. Here are a few ideas:
- Using electroluminescent (EL) wire, fiber optics, and lasers
- Ornamenting your robot with self-contained body lighting (glow-in-the-dark sticks, rave lights, magnetic LED earings)
- Outfitting your robot with different colors of cold cathode fluorescent tubes
- Using passive decoration, like decals, fluorescent paint jobs, and transfer film
Using Electroluminescent Wire
Electroluminescent (EL) wire looks a lot like small plastic tubing, but it acts more like a neon sign. When electricity is applied to it, the wire glows in a rainbow of colors.
Here’s how it works: At the center of electroluminescent wire is a solid copper conductor. This conductor is coated with an electroluminescent phosphor. To excite the phosphor, two very fine wires (electrodes) are wrapped around the center conductor. Over this whole arrangement is a clear plastic sheath, which also protects the phosphor-coated wire and electrodes inside.
Apply current to the wires, and the phosphor lights up. Colors are produced by varying the chemical makeup of the phosphor, and also by altering the tint of the plastic protective sheath, varying the voltage, and/or varying the frequency of the current driving the wire. The end result is a brightly, colored, glowing wire.
Practical Applications for Electroluminescent Wire
EL wire has several uses in robotics. One is decoration—EL wire looks cool! Wrap the wire around your robot, or use the thinner EL wire as glowing cat's whiskers for your robopet. Let your imagination run free. There is no limit to how you can dress up your robot with EL wire.
More uses for electroluminescent wire:
- Line following. Rather than a black or white line on the floor, the robot can follow the glow of the EL wire (put a sheet of clear acrylic plastic over the wire so the robot travels over a smooth surface). Because EL wire is available in colors, several line-following robots can trace their own color-coded line.
- Robot-to-robot communications. A 1- or 2-foot strand of EL wire can be wrapped around your medium-sized robot, and provides an omnidirectional semaphore signal for other robots. Each robot can be distinguished by the color of the EL wire, or by pulsing the wire in a specific pattern (think Morse Code, only faster).
- Object illumination. Select a greenish or yellowish EL wire color, and use it to provide a soft illumination of objects for a robot equipped with cadmium sulfide (CdS) cells. Most CdS cells exhibit a peak spectral response at about 550 nanometers, which is toward the green/yellow portion of the spectrum. Because of their heightened sensitivity to this light, even a small length of EL wire produces adequate lighting for many object detection applications.
- Robot beacon and navigation. On a similar theme, you can place EL wire along a wall baseboard; the robot can follow the glow of the wire to navigate within a room, or even from room to room.
Color choice varies by manufacturer, but most offer the following, in diameters from 1.3 millimeters (called “angele hair”) to 5.0 millimeters. Colors include: aqua (blue/green), deep red, green, indigo (deep blue), lime green, orange, pink, purple, red, white, and yellow. The blues and greens tend to be the most vibrant colors.
Powering EL Wire
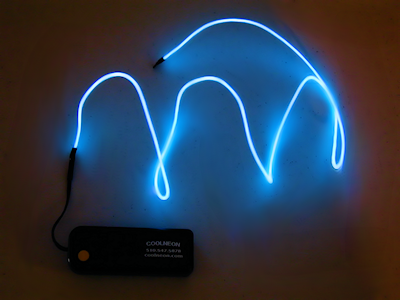
EL wire is driven by a high- voltage alternating current (AC). But it need not be plugged into a wall outlet. Rather, the wire uses small, self-contained inverters that produce the required voltage from a small DC source (usually 3 to 12 volts; AA batteries are sufficient). An example inverter and EL wire is are shown in Figure 1.

[Figure 1. Photo Courtesy CoolNeon]
Inverters are rated by their output capacity, which in turn determines the length of EL wire that can be driven. Small inverters can drive from three 3 to six 6 feet of EL wire; higher- capacity units drive 20 to 30 feet (and more) of wire. Models designed for commercial lighting can drive several hundred feet.
Inverters are not terribly expensive—consumer models retail for $7 to $12. You’ll have good results if you add more inverters to drive additional strands of EL wire, rather than try to do it all from one unit.
Additionally, you can opt for an inverter that blinks the EL wire at specific intervals, or keeps it on continuously. Specialty inverters are available with built-in sequencers that selectively activate several strands of EL wire in turn.
Note that inverters are available at different operating frequencies—from 400 Hz (cycles per second) to over 12,000 Hz. The brightest outputs are provided at the higher frequencies. The color of some of phosphors can be altered by changing the frequency of the AC power signal.
For example, the “blue” phosphors can be changed from green to blue by varying the frequency between 400 and about 6,000 Hz. Changing the input voltage of the inverter, which in turn changes the output voltage, also alters the color of some EL wire.
You’ll probably want to turn the EL wire on and off. There are many ways of doing this, including a bipolar or MOSFET power transistor, but a simple method is to use a small relay, like that in Figure 2. Connect the relay to control the power connection to the EL inverter module.

[Figure 2]
Using Fiber Optics
 Fiber optics is an old technology, and it’s easy to forget about when planning light effects for your robot. But there’s still plenty of life left in good ol’ fiber-optic lighting, and new technologies make it even more exciting.
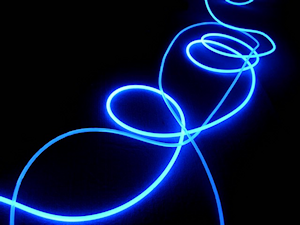
Case in point: Sideglow fibers emit light over the length of the strand, not just the end. They look more like electroluminescent wire, but can be made to glow any color, even alternate colors. [Photo courtesy Mayki Lighting]
Surprisingly, fiber-optics strands suitable for lighting effects can be hard to find. Most fiber-optic material sold these days is are for data transmission. Expensive. You want the cheap fiber-optic strands used to make “fountain lamps” popular in the early 1970s. Fortunately, a few retailers, such as Target and Spencer Gifts, sell low-cost reproductions of these lamps. You can yank off the fiber and use it in your robot projects.
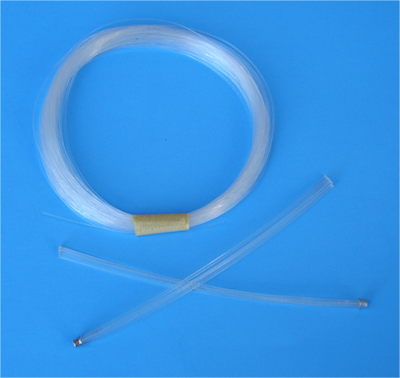
Figure 3 shows a spool of thin “angel hair” optical fiber of the type used in light fountains, as well as some bundles of thicker end-emitting fiber optics. The spool of optical fiber is ready to be cut into lengths, and bundled on one end. Fit the end of the bundle against a superbright LED.

[Figure 3]
Using Body Jewelry
Light-up body jewelry uses various types of LEDs—flashing and continuous— electroluminescent panels and wires, and even Cyalume glowsticks. Glow-in-the-dark sticks can be purchased at mall stores and even discount retailers such as Walmart. Look for a party shop, such as Spencer Gifts (mail order and mall stores) for light-up body jewelry. For more online choices, try various Web searches:
glowstick
rave lights
glow jewelry
magnetic led earrings
Of particular interest are the LED earrings. Most use a magnetic backing rather than a piercing or clip. They’re battery- powered and pulse in any of several colors. Colors vary—typical are alternating blue and red. You can attach the earrings to your robot using glue, double-sided foam tape, or even with a flexible magnet strip.
Using Cold Cathode Fluorescent Tubes
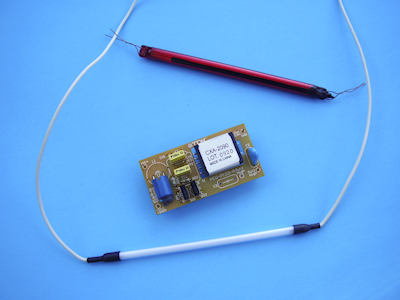
Cold cathode fluorescent lamp (CCFL) tubes are commonly used to “hop-up” a personal computer with glow effects. The light consists of the tube itself, plus a miniature high- voltage inverter, like that in Figure 4. Inside the tube is a coating that causes it to glow in any of several striking colors, as well as white and ultraviolet. The inverter steps up the 5- to 12- volt battery voltage to 100 or more volts, for lighting the tube.

[Figure 4]
CCFL tubes are available in different lengths. For robotics applications, the shorter 100mm (about 4") length is about right. Another common length is 300mm (about 12"). If the tube is “bare,” you’ll want to place it in a clear, rigid protective tube. You can purchase these at some home improvement stores, as well as at specialty plastics outlets. The tube helps prevent breakage, and the possibility of small shards of glass flying everywhere.
If a rigid tube is not practical, clear flexible hosing, available at any pet shop that sells aquarium supplies, is the next best choice. The tube mightay still break if something strikes it, but the glass will remain inside the hose.
Using Lasers
Lasers can be used for unusual and brilliant lighting effects, as long as your robot will be used in a protected environment, without curious kids who might pick up your robot and look directly into the laser light. Laser pointers are battery-powered, and relatively inexpensive. The most common color is red, but laser pointers in green and a few other colors are available. Cost is considerably more for these, as non-red laser diodes are more expensive to manufacture.
You may opt to use the laser pointer as-is, mounting it directly to the robot. The on/off switch is spring-loaded, so you’ll need to work out a way to keep it depressed. Or, you can remove the laser diode from the body of the pointer, and activate it via a transistor or relay.
Removing the laser diode is not always as easy as it sounds, or even recommended: the metal barrel of the pointer acts as a heat sink. Without the heat sink, the laser diode may prematurely burn out. You will also need to provide regulated voltage. A limiting resistor may be needed to prevent the laser diode from pulling too much current from the robot’s power supply.
Of course, the usual precautions of about using lasers should be observed. Avoid looking directly into the beam, and don’t allow the robot to be used in any situation where the beam can accidentally point toward anyone—or any animal, for that matter.
One idea for a laser-equipped robot is “light writing” using the open- bulb setting of a 35mm film camera. Set the camera on a tripod, set the camera to “bulb” (the shutter stays open until you release it), turn off the lights, and let your robot loose. The laser will “paint” streaks of colored light on the film as it roams around the room.
Using Passive Decoration
While adding spark and dazzle with different kinds of light effects, don’t forget so-called passive decoration: bright fluorescent paint jobs, maybe some flame decals. How about a skull-and-crossbones hood ornament on the front of the robot? Here are some ideas to get your started.
Water-slide Decals
If you’ve ever assembled a plastic model kit, you know about water-slide decals. You dip the decal into warm water, wait a few seconds, then slide the clear decal emulsion off the backing paper, and onto your model.
Modern marvels being what they are, you can print your own water-slide decals using a laser or ink-jet printer. The special decal paper can accept black-and-white or color images. With some printers you have to print a full sheet at a time, but with others let you use smaller paper sizes of down to 3" by 4" inches. Once they are printed, cut out the individual decals and apply them to your robot.
You can use water-slide decals for making control panels or labels, but don’t forget using them to dress up your robot with color or design. The decals will stick to most any smooth surface, and should be “fixed” into place with a gloss or matte over-spray. These chemicals are available at any hobby or art supply store, and they are expressly designed for used with decals.
Water-slide decal paper is but one subgroup of a larger family of printer transfer films, which also include clear and translucent “sticky-back”—used primarily for overlays—and adhesive-backed opaque vinyl, often used for bumper stickers and signs. These materials share the common trait of compatibility with color copiers and laser and/or ink- jet printers, allowing you to prepare your own designs quickly and relatively cheaply.
Transfer Film
Another option is transfer film, designed to be applied using a variety of techniques, such as pressure or heat. With just a laser printer, ink-jet printer, or copier, you can transfer images to many kinds of robotic surfaces, including wood, plastic, and metal.
Some transfer films require a special kind of printer that uses a dry-resin thermal transfer ink for the most vibrant colors (you can sometimes find these at high-end copy shops). But most work with ordinary ink-jet and laser printers. The transfer method is usually either heat—the toner/ink transfers from film to surface using an iron or heat press—or by immersion in liquid, usually water.