Step-by-Step: Soldering a Barrel Plug onto a Battery Holder or DC Wall Transformer
Of all the schemes used for connecting batteries to robot circuits I like using the barrel plug the most. Many DC wall transformers already have a barrel plug (though the correct size is not guaranteed). And more and more microcontroller boards, like the Arduino, are made to accept barrel plugs for input power.
You can purchase barrel plugs in different sizes and solder them onto the leads of a battery holder. Or you can replace whatever plug is on your favorite DC wall transformer with the one you want for your battery pack.
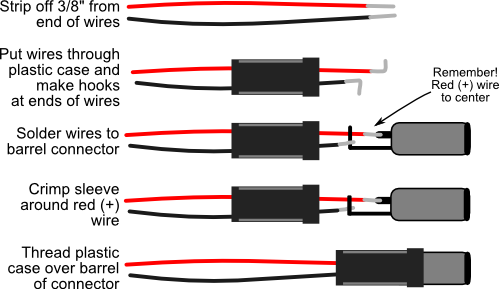
Here’s the process for soldering your own barrel plug; see the figure below for the steps.
- Be sure you’re using the correct barrel diameter. Coaxial barrel plugs come in various sizes (all in millimeters). The 2.1mm size is quite common. This is the inside diameter of the barrel.
- Double-check the center polarity. Center-positive is the most common, but some systems use center-negative. You do not want to get the polarity mixed up!
- If using a battery holder, remove the batteries from the holder.
- Unscrew the plastic shell of the barrel connector. Thread it over the wires from the battery pack. Some barrel connectors also come with a plastic inner sleeve. Thread this over the battery pack wires as well. Note: The sleeve may not be heat-shrink tubing! It’s just ordinary thin plastic. If you want to use heat-shrink over the finished soldered connection, use some from your own stock.
- Prepare to solder the wires from the pack to the connector by stripping approximately 3/8" of insulation from the ends.
- Pre-tin the wires and the connector terminals. Pre-tinning involves applying a dab of solder onto the metal. Bend the ends of the leads to make hooks for the next step.
- Make a little hook at the end of the wire by bending with a small needle-nose pliers.
- Using a small clip, vise, or pair of pliers to hold the metal barrel (it gets hot!), start by soldering the red (positive, or +) wire from the battery pack to the appropriate terminal of the plug (remember: observe proper polarity; usually the + wire goes to the center connector). Apply only a little bit of solder to complete.
- Repeat the soldering process for the outer terminal of the barrel.
- The outer terminal probably has a crimp tab. Use pliers to close the tab around the wires. The tabs serve as strain relief to help prevent the wires from being pulled out of the connector.
- Inspect the soldering job, and clip off any excess wire as needed. Place the inner plastic sleeve (if any) over the terminals, then screw the plastic shell into place.
